
If you’ve ever admired how clean and smooth the kitchen counters are, with the sink seeming to melt perfectly into the stone, you have an undermount sink. This modern design makes cleaning up easy and gives your kitchen a custom, high-end, architectural look right away. Instead of dropping in over the top, it goes under the counter.
I’ve helped install undermount sinks in both granite and quartz countertops. It’s not rocket science, but attaching a heavy stainless steel, copper, or cast-iron sink to the bottom of a big stone slab takes careful planning.
The stakes are high: if you mess this up, a sink full of dirty dishes and a heavy garbage disposal could fall into your lower cabinets, damaging your plumbing and woodwork. Making sure the sink is properly supported and making a perfect, waterproof silicone seal so it never leaks are the two most important parts of this project. Let’s go through the whole installation process step by step, making sure that your expensive stone doesn’t get damaged in the process.
Why Choose an Undermount Sink for Granite Countertops?
Before you start the hard work, it helps to know why this kitchen upgrade is so popular with both homeowners and interior designers.
The Seamless, Spacious Look: The beautiful stone surface goes all the way to the edge of the sink bowl without a big, raised metal rim on top of the counter. This line of sight that doesn’t break up makes the whole kitchen look bigger, cleaner, and much more up-to-date.
Ultimate Kitchen Hygiene: Drop-in sinks have a lip that sits on the counter, which makes a small seam that always holds water, food crumbs, and eventually black mold. You can easily wipe spills, water, or cutting board debris from the counter into the sink basin with an undermount sink.
Solid natural stone countertops, like granite, marble, and engineered quartz, are very dense and strong. Cheap laminate countertops have a particleboard core that would swell and rot if it got wet from an undermount sink. Solid stone is the best material for this suspended design.
Read More: Porcelain Countertops
The Great Debate: Drilling vs. Epoxy Sink Clips
When you learn how to attach an undermount sink to granite, you’ll quickly come across two different ideas: drilling into the stone or using epoxy adhesives.
Why You Should Avoid Drilling (The DIY Danger):
Professional stone fabricators use special diamond drill bits that are cooled by water and have strict depth-stop collars to drill shallow anchor holes into the bottom of a granite slab. Don’t try to drill into your granite if you’re a DIY homeowner with a standard masonry bit and a heavy hand. There’s a good chance you’ll drill too deep and make a hole in the top of your $4,000 island, or even worse, hit a natural crack and break the slab in half.
The Solution: Epoxy Sink Clips
Using epoxy sink clips is the safest and most reliable way to mount a sink under a granite countertop on your own. These are metal brackets with a base plate that has holes in it. You don’t drill a screw into the stone; instead, you use a two-part structural epoxy that is strong enough for industrial use to permanently glue the base plate to the bottom of the granite. This epoxy makes a bond that is stronger than the stone itself when it dries. It can easily hold the weight of a sink full of water and a heavy garbage disposal.
Essential Tools and Materials for the Job
Before you start, make sure you have all of these things. Once you start mixing fast-drying glues, it’s very important to have everything within reach.
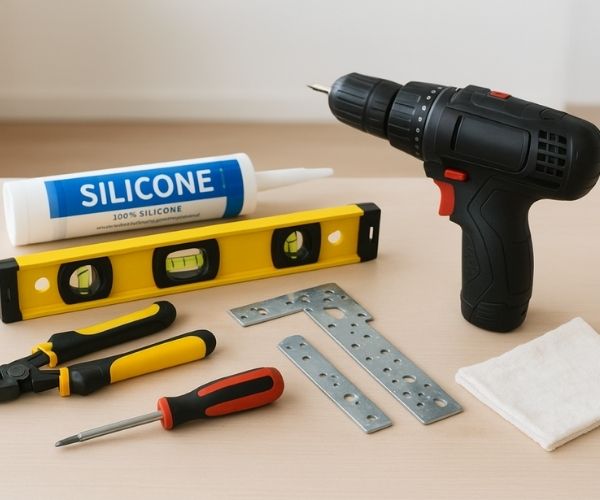
- Your new undermount sink: Should fit properly in the base of your current cabinet.
- Undermount Sink Clips/Brackets: Usually, you can buy undermount sink clips and brackets in packs of 4 to 8.
- Two-Part Structural Epoxy: Look for epoxies that are made just for bonding stone to metal. Don’t use regular wood glue or super glue.
- 100% silicone sealant: Must be waterproof, safe for use in kitchens and bathrooms, and resistant to mold. Don’t use acrylic painter’s caulk.
- Denatured alcohol and clean rags: Are important for getting rid of grease and dust on stone.
- A 2×4 wood board: That is a little longer than the cutout in your sink.
- A strong bar clamp: To keep the sink in place while you work.
- Razor Scraper: Use this to get rid of old silicone if you’re replacing it.
- A level and a flashlight: It gets dark in those lower cabinets.
Step-by-Step Guide: How to Fit an Undermount Sink to Granite
To make sure your installation is permanent and leak-proof, follow these steps in this order.
Step 1: Removing the Old Sink and Prepping the Stone
You need to first disconnect the plumbing, unscrew the old clips, and carefully pull the old sink away from the stone if you are replacing an old sink.
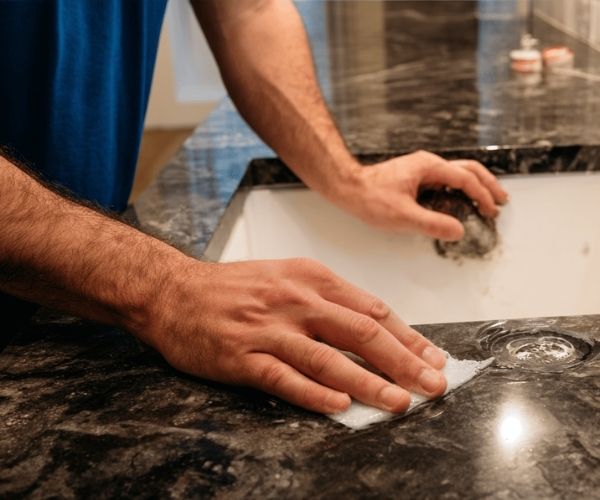
Your most important job starts once the old sink is out of the way: getting everything ready. Use your razor scraper to carefully scrape off all of the old silicone from the bottom of the granite.
After the old stuff is gone, soak a clean cloth in denatured alcohol and scrub the area around the cutout on the bottom of the granite. Your new silicone and epoxy won’t stick if there is any grease, sawdust, or old glue left over. The sink will eventually fall if the epoxy doesn’t stick to the stone because of dust.
Read More: Granite vs Quartz
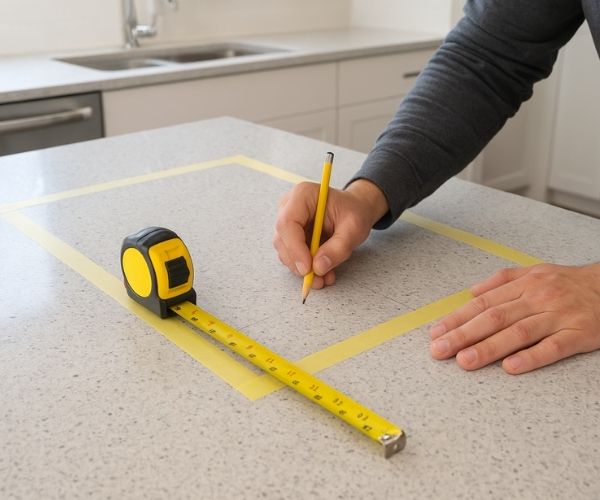
Step 2: The Important “Dry Fit”
You need to do a “dry fit” first to make sure the sink lines up perfectly with the cutout in your countertop and your plumbing before you mix any permanent glues.
Put the sink under the counter and hold it there. It should fit perfectly in the hole so that the sink’s rim doesn’t stick out past the edge of the stone (unless you want a positive reveal). Make sure that the drain lines up with your current P-trap and that there is enough space behind the sink bowl for the faucet holes in the granite.
Once everything is in the right place, use a pencil or permanent marker to draw the sink rim’s exact outline on the bottom of the granite. This gives you a perfect guide for where to put your silicone later.
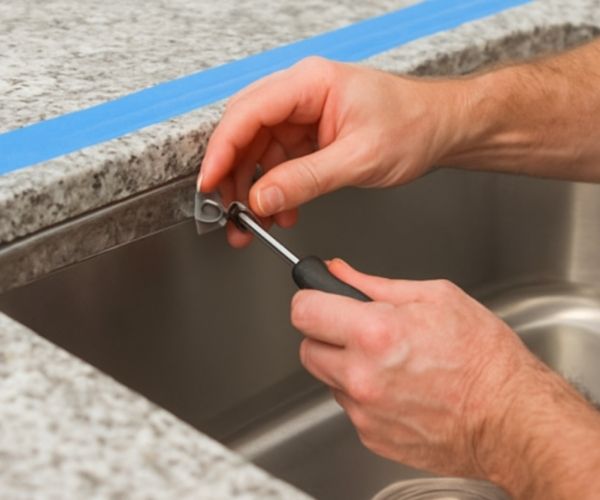
Step 3: Attaching the Epoxy Sink Clips
It’s time to set up the structural support now.
- Plan out where your clips will go. Most of the time, you need two clips on each side of a standard stainless steel sink (left, right, front, and back). These clips should be placed just outside the pencil line you just drew.
- Follow the directions on the package to mix your two-part epoxy on a piece of scrap cardboard.
- Put a lot of the mixed epoxy on the holes in the base of your sink mounting clips and push it through.
- Push the clips hard against the bottom of the granite. The epoxy should squish through the holes, which will make a “mushroom” effect that holds the clip in place when it hardens.
- Stop and Wait: Give the epoxy time to harden. This can take anywhere from 10 minutes to 24 hours, depending on the brand. Do not put the sink up until these clips are very strong.
Step 4: How to Seal an Undermount Sink to Granite
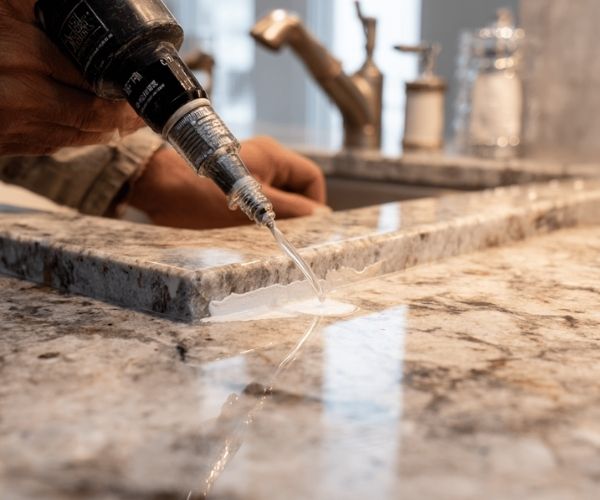
This step makes the difference between a dry cabinet and a nightmare that is rotting and full of water. The clips hold the weight, and the silicone keeps the water out.
Put your completely waterproof silicone sealant in a caulking gun. Put a thick, continuous line of silicone directly on the top flat edge of the metal sink or on the bottom of the granite, right inside your pencil line.
To make sure the sink and countertop are completely waterproof, this bead of silicone must not have any gaps, air bubbles, or breaks. Imagine it as a slow and steady process, like piping a thick, unbroken ring of icing around the edge of a cake.
Step 5: Mounting, Clamping, and Securing the Sink
This is the hard part, and the key to a perfect installation is a simple woodworking trick that uses a 2×4 and a bar clamp. It’s a good idea to have a friend help you out here.
- Put your scrap 2×4 piece of wood flat on top of the granite countertop, right over the cutout for the sink.
- Lift the sink straight up from under the cabinet and into the wet silicone, pressing it hard against the bottom of the counter.
- Someone should hold the sink from below while you slide the long end of your bar clamp down through the drain hole. Put the bottom jaw of the clamp around the drain hole in the sink and the top jaw around the 2×4 wood block on the counter.
- Make the bar clamp tighter. The clamp will pull the sink up hard, making it fit perfectly against the granite and squeezing the silicone.
- You can permanently lock the sink in place by swinging your epoxy sink clips over the edge of the sink and hand-tightening the wingnuts. You could bend the sink rim if you use a power drill to tighten these.
- To get a perfectly clean finish, wipe away any extra silicone that squeezes out around the inside edge of the sink bowl with a damp cloth.
Step 6: The Curing Process
When the clips are tight, leave.
Don’t put in the plumbing! Don’t connect the heavy trash disposal! Don’t fill the sink with water to see if it works! It takes at least 24 hours for the silicone sealant to fully cure and become rubbery.
If you add the vibrating, heavy weight of a garbage disposal or fill the sink with 30 pounds of water too soon, the new, wet seal will break and there will be a leak. For extra protection, leave the bar clamp in place all night.
Step 7: Reconnecting the Plumbing
You can safely take off the bar clamp and the 2×4 after 24 full hours.
Use plumber’s putty to attach your drain assembly, mount your garbage disposal to the locking ring, and connect your dishwasher drain lines and P-trap.
Finally, reconnect the hot and cold water lines to the faucet, turn on the valves, and run the water to see if your new undermount sink is working perfectly.
Common Mistakes to Avoid When Mounting Sinks Under Granite
To make sure your installation lasts as long as the kitchen, stay away from these common DIY mistakes:
- Using Acrylic Caulk Instead of Silicone: When exposed to standing water, regular painter’s caulk or latex caulk will eventually break down, crack, and wash away. Use only 100% silicone for the kitchen and bathroom.
- Skipping the Alcohol Wipe: You can use the best silicone and epoxy in the world, but if you put it on top of a layer of invisible stone dust or greasy cabinet residue, it will peel right off. Getting ready is the most important thing.
- Over-Tightening the Clips: The clips are supposed to keep the sink snug against the stone. You can easily bend the rim of a stainless steel sink with a wrench, which will make a gap where water can leak through. A final quarter-turn with your hand is usually just right.
Frequently Asked Questions (FAQs)
Is it okay to use construction glue, like Liquid Nails, instead of silicone?
No. Construction adhesive dries hard and stiff. A rigid adhesive will eventually crack and break the waterproof seal because your sink expands and contracts a little when you use hot and cold water. Silicone stays flexible and rubbery, so it can move with the sink while still keeping water out.
How much weight can an undermount sink hold?
An undermount sink is very strong when it is installed correctly with epoxy clips and heavy-duty silicone. It can easily hold a heavy 3/4 HP garbage disposal, a sink basin full of water, and heavy cast-iron pots without moving.
Do I need a professional to install an undermount sink?
An experienced DIYer can definitely finish this project successfully, but hiring a pro guarantees the work. The most important things are to be patient, use the right adhesives (epoxy and silicone), and use the 2×4 clamping method to keep the sink from moving while the seal cures.